TDD By Example

TDD (Test Driven Development) By Example

What is Test driven development?
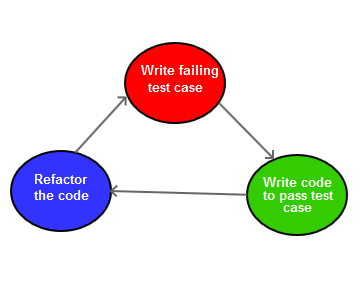
Write code only to fix a failing test case. That is the gist of test driven development (TDD). This is a cyclic process- You first write a test for a requirement, and then you write some real code to pass the test, then you refactor the code for best possible design using various design principle for example SOLID , GRASP etc. The benefit here is that you already have a safety net as tests before refactoring the code. Whatever refactoring you are doing, your tests should not fail.
TDD is an evolving process. You evolve your software design by simply following above steps for each and every requirements of your software. It keeps you away from verbose code, over engineering and making unnecessary assumption.
The Test->Code->Refactor cycle also known as red-green-blue. You can understand the significance of these colours from below diagram.
TDD-By-Example
Since the title of this post is TDD by example, let’s do an example using TDD to understand the concepts better.

We will follow the same cycle
Write a failing test – make it pass – refactor the code.

The problem is:
Create a simple shopping cart

We will add different requirements to our current problem and we evolve our design and code accordingly.

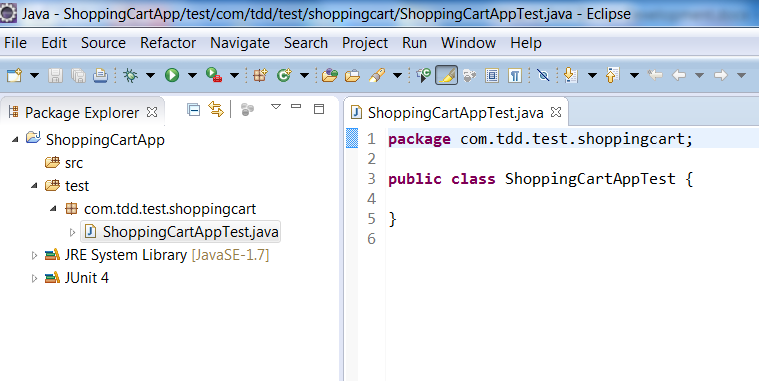
Create a simple java project ShoppingCartApp in Eclipse, add JUnit4 library dependency to it. First create a test folder and a class ShoppingCartAppTest.
TDD-By-Example1
Requirement: Create an empty shopping cart
When: An empty shopping cart created.
Then: the product count of cart should be 0.

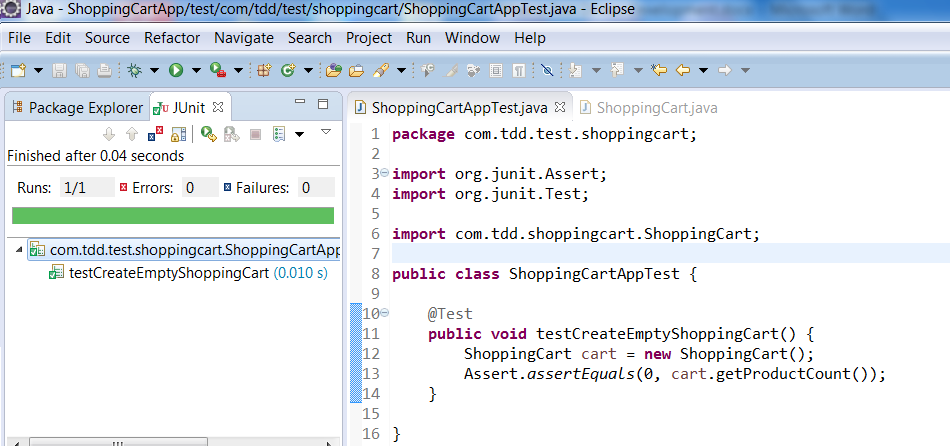
Add a test to create an empty shopping cart in ShoppingCartAppTest class. Make an assertion to product count 0.

package com.tdd.test.shoppingcart;

import org.junit.Assert;
import org.junit.Test;

public class ShoppingCartAppTest {

	@Test
	public void testCreateEmptyShoppingCart() {
		ShoppingCart cart = new ShoppingCart();
		Assert.assertEquals(0, cart.getProductCount());
	}
}

Now it is giving compilation error since we don’t have ShoppingCart class. Let’s create a ShoppingCart class in src folder and a method getProductCount() in it.

package com.tdd.shoppingcart;

public class ShoppingCart {
	
	public int getProductCount() {
		return 0;
	}
}

Now run the test case. It should pass. We have completed our first requirement using TDD.
TDD-By-Example4
Requirement: Add Product to shopping cart
When: Add 1 unit of ‘Gatsby hair cream’, unit price 30 Rupees.
Then:
– The product count of the cart should be 1.
– The total value of cart should be 30 rupees.

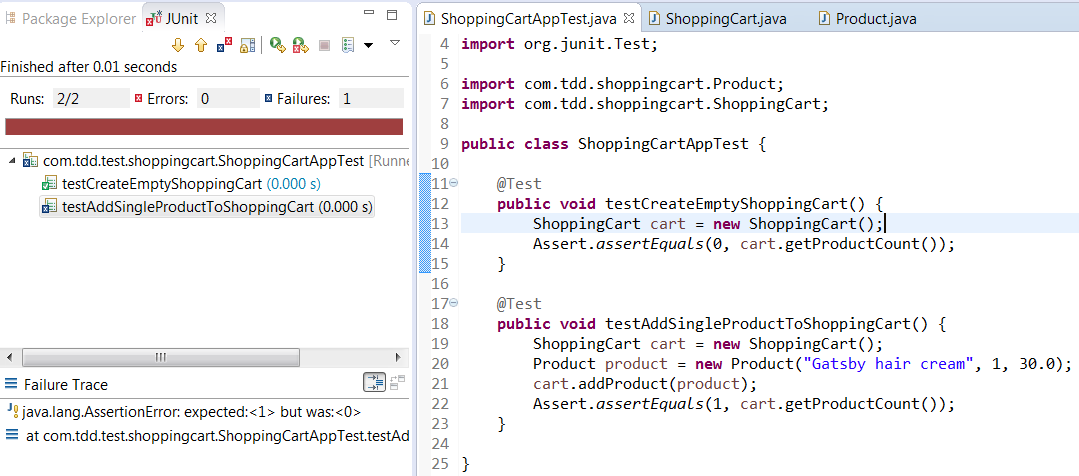
Add a test to add a Product to ShoppingCart. Make assertion for product count 1 and then later make the assertion for the total cart value should be 30.

import org.junit.Assert;
import org.junit.Test;

import com.tdd.shoppingcart.Product;
import com.tdd.shoppingcart.ShoppingCart;

public class ShoppingCartAppTest {

	@Test
	public void testCreateEmptyShoppingCart() {
		ShoppingCart cart = new ShoppingCart();
		Assert.assertEquals(0, cart.getProductCount());
	}
	
	@Test
	public void testAddSingleProductToShoppingCart() {
		ShoppingCart cart = new ShoppingCart();
		Product product = new Product("Gatsby hair cream", 1, 30.0);
		cart.addProduct(product);
		Assert.assertEquals(1, cart.getProductCount());
	}
}

It will give you compilation error since we don’t have Product class and also there is no addProduct() method to our ShoppingCart class.

Let’s create the Product class as per our requirement.

package com.tdd.shoppingcart;

public class Product {
	
	private String productName;
	private int quantity;
	private double totalPrice;

	public Product(String productName, int quantity, double totalPrice) {
		this.productName = productName;
		this.quantity = quantity;
		this.totalPrice = totalPrice;
	}

	public String getProductName() {
		return productName;
	}

	public void setProductName(String productName) {
		this.productName = productName;
	}

	public int getQuantity() {
		return quantity;
	}

	public void setQuantity(int quantity) {
		this.quantity = quantity;
	}

	public double getTotalPrice() {
		return totalPrice;
	}

	public void setTotalPrice(double totalPrice) {
		this.totalPrice = totalPrice;
	}
}

Add ‘addProduct()’ method to ShoppingCart class.

package com.tdd.shoppingcart;

public class ShoppingCart {
	
	public int getProductCount() {
		return 0;
	}

	public void addProduct(Product product) {
		
	}
}

Now you have failing test since in reality there is no product added to ShoppingCart.
TDD-By-Example8

It’s time to refactor our ShoppingCart class. Let’s add a product holder to ShoppingCart class and add products to it.

package com.tdd.shoppingcart;

import java.util.ArrayList;
import java.util.List;

public class ShoppingCart {

	private List<Product> productList = new ArrayList<>();
	
	public int getProductCount() {
		return productList.size();
	}

	public void addProduct(Product product) {
		productList.add(product);
	}
}

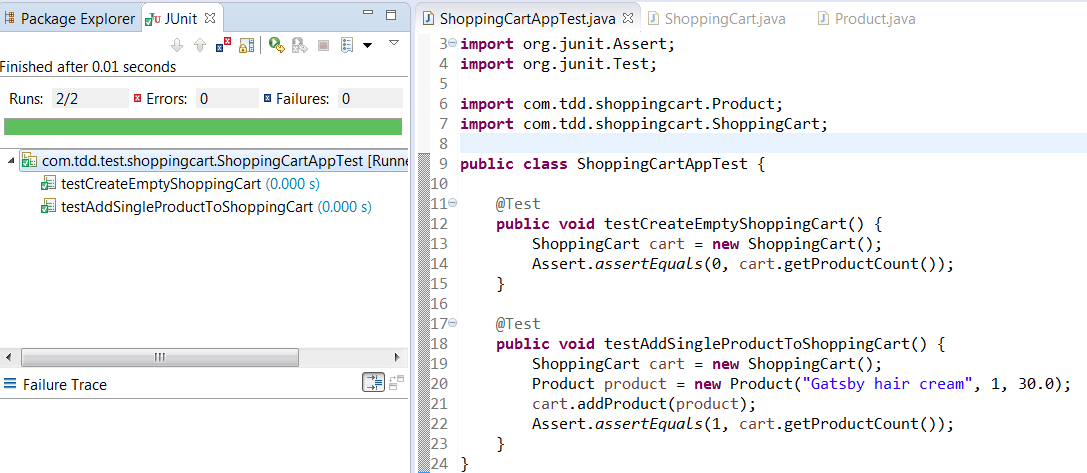
Run your test again. You can see your test is passing now.
TDD-By-Example10
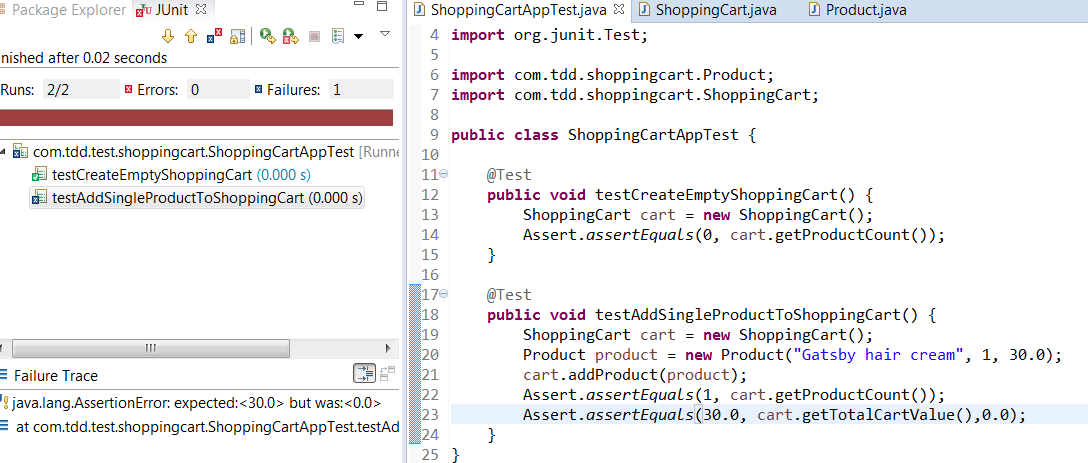
We have completed the first part of the requirement. Now add an assertion for the second requirement- the total cart value should be 30.0.

package com.tdd.test.shoppingcart;

import org.junit.Assert;
import org.junit.Test;

import com.tdd.shoppingcart.Product;
import com.tdd.shoppingcart.ShoppingCart;

public class ShoppingCartAppTest {

	@Test
	public void testCreateEmptyShoppingCart() {
		ShoppingCart cart = new ShoppingCart();
		Assert.assertEquals(0, cart.getProductCount());
	}
	
	@Test
	public void testAddSingleProductToShoppingCart() {
		ShoppingCart cart = new ShoppingCart();
		Product product = new Product("Gatsby hair cream", 1, 30.0);
		cart.addProduct(product);
		Assert.assertEquals(1, cart.getProductCount());
		Assert.assertEquals(30.0, cart.getTotalCartValue());
	}
}

This will give you compilation error since we don’t have the getTotalCartValue() method in ShoppingCart class. Add this method to ShoppingCart.

package com.tdd.shoppingcart;

import java.util.ArrayList;
import java.util.List;

public class ShoppingCart {

	private List<Product> productList = new ArrayList<>();
	
	public int getProductCount() {
		return productList.size();
	}

	public void addProduct(Product product) {
		productList.add(product);
	}

	public double getTotalCartValue() {
		return 0.0;
	}
}

Now run the test. You will have failing test case.
TDD-By-Example11
Its time to refactor our ShoppingCart class. Add some real logic to calculate cart value.

package com.tdd.shoppingcart;

import java.util.ArrayList;
import java.util.List;

public class ShoppingCart {

	private List<Product> productList = new ArrayList<>();
	private double totalCartValue;

	public int getProductCount() {
		return productList.size();
	}

	public void addProduct(Product product) {
		productList.add(product);
	}

	public double getTotalCartValue() {
		if (productList.size() > 0) {
			for (Product product : productList) {
				totalCartValue = totalCartValue + product.getTotalPrice();
			}
		}
		return totalCartValue;
	}
}

Now run the test again. You test is passing now.
TDD-By-Example12
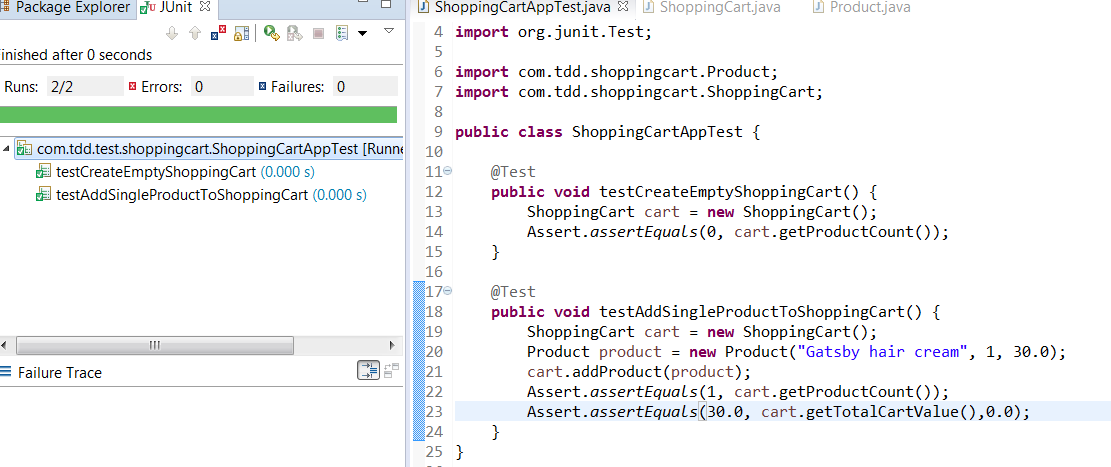
We have completed the two requirements.

Requirement: Add different Products to shopping cart
When:
– Add 1 unit of ‘Gatsby hair cream’, unit price 30 Rupees.
– Add 1 unit of ‘Bvlgiri Soap’, unit price 100 Rupees.

Then:
– The product count of the cart should be 2.
– The total value of cart should be 130 rupees.

Add a test to add different Products to ShoppingCart. Make assertion for product count 2 and the total cart value 130.

package com.tdd.test.shoppingcart;

import org.junit.Assert;
import org.junit.Test;

import com.tdd.shoppingcart.Product;
import com.tdd.shoppingcart.ShoppingCart;

public class ShoppingCartAppTest {

	@Test
	public void testCreateEmptyShoppingCart() {
		ShoppingCart cart = new ShoppingCart();
		Assert.assertEquals(0, cart.getProductCount());
	}
	
	@Test
	public void testAddSingleProductToShoppingCart() {
		ShoppingCart cart = new ShoppingCart();
		Product product = new Product("Gatsby hair cream", 1, 30.0);
		cart.addProduct(product);
		Assert.assertEquals(1, cart.getProductCount());
		Assert.assertEquals(30.0, cart.getTotalCartValue(),0.0);
	}
	
	@Test
	public void addDifferentProductsToTheCart(){
		ShoppingCart cart = new ShoppingCart();
		Product gatsByCream = new Product("Gatsby hair cream", 1, 30.0);
		Product bvlgiriSoap = new Product("Bvlgiri Soap", 1, 100.0);
		cart.addProduct(gatsByCream);
		cart.addProduct(bvlgiriSoap);
		Assert.assertEquals(2, cart.getProductCount());
		Assert.assertEquals(130.0, cart.getTotalCartValue(),0.0);
	}
}

Run the test, it will pass without any refactoring.

It’s time to add more requirements to our Shopping Cart application Let’s move to the next requirement (on second page).
Go to the next page – Click on the below red circle with page number.

Analysis of algorithms

Analysis of Algorithms

  • “Analysis of Algorithms” is concerned primarily with determining the memory (space) and time requirements (complexity) of an algorithm.
  • The time complexity (or simply, complexity) of an algorithm is measured as a function of the problem size.

Some examples are given below.

  1. The complexity of an algorithm to sort n elements may be given as a function of n.
  2. The complexity of an algorithm to multiply an m*n matrix and an n*p matrix may be given as a function of m , n , and p.

How efficient is an algorithm or piece of code depends on a lots of resources, including:

  • CPU (time) usage
  • memory usage
  • disk usage
  • network usage

All are important but we will mostly talk about time complexity (CPU usage).
when analyzing an algorithm, one might find that the time (or the number of steps) it takes to complete a problem of size n

Units for measuring an algorithm’s running time

Identify the most important operation of the algorithm, called the basic operation , the operation contributing the most to the total running time, and compute the number of times the basic operation is executed.

  • Assigning a value to a variable
  • Calling a method
  • Performing an arithmetic operation (for example, adding two numbers)
  • Comparing two numbers
  • Indexing into an array
  • Following an object reference
  • Returning from a method.

The time required by a function/procedure is proportional to the number of “basic operations” that it performs. Here are some examples of basic operations:

  • one arithmetic operation (e.g., +, *).
  • one assignment (e.g. x = 0)
  • one test (e.g., x == 0)
  • one read (of a primitive type: integer, float, character, boolean)
  • one write (of a primitive type: integer, float, character, boolean)

Orders of Growth
Order of growth

Worst-Case, Best-Case, and Average-Case Efficiencies
there are many algorithms for which running time depends not only on an input size but also on the specifics of a particular input.

  • The worst-case complexity of the algorithm is the function defined by the maximum number of steps taken in any instance of size n. This represents the curve passing through the highest point in each column.
  • The best-case complexity of the algorithm is the function defined by the minimum number of steps taken in any instance of size n. This represents the curve passing through the lowest point of each column.
  • The average-case complexity of the algorithm, with is the function defined by the average number of steps over all instances of size n.

Consider, as an example, sequential search.

 public int sequentialSearch(int[] a, int x) {

        int n = a.length;
        int i;
        for (i = 0; i < n && x != a[i]; i++);
        if(i == n) return -1;
        return i;
    }

Best Case
Best case sequential search
Worst Case
worst case sequential search
Average Case
sequential search average case

Clearly, the worst-case analysis provides very important information about an algorithm’s efficiency by bounding its running time from above.
best-worst-average case graph
The important thing to realize is that each of these time complexities define a numerical function, representing time versus problem size. Time complexities are complicated functions and we need to simplify that to work with them For this, we need the “Big Oh” notation.

The Big Oh Notation

when analyzing some algorithm, one might find that the time (or the number of steps)it takes to complete a problem of size n is given by T(n)=4n2 -2n+2. If we ignore constants (which makes sense because those depend on the particular hardware the program is run on) and slower growing terms, we could say “T(n) grows at the order of n ” and write: T(n) = O(n2).

    • It proves to be much easier to talk in terms of simple upper and lower bounds of time-complexity functions using the Big Oh notation. The Big Oh simplifies our analysis by ignoring levels of detail that do not impact our comparison of algorithms.
    • The Big Oh notation ignores the difference between multiplicative constants. The functions f(n) = 2n and g(n) = n are identical in Big Oh analysis.

For a problem of size N:

      • a constant-time algorithm is “order 1” : O(1)
      • a linear-time algorithm is “order N” : O(N)
      • a quadratic-time algorithm is “order N squared” : O(N2)

Note that the big-O expressions do not have constants or low-order terms. This is because, when N gets large enough, constants and low-order terms don’t matter

f(n) = 2n2 + 3n + 1 = O(n2)

big-o

big-o-1

big-oh

Example Big-O calculation
big-oh
Example Big-Omega calculation
big-omega
Example Big-Theta calculation
big-theta

Relationship
screen-shot-2016-12-18-at-1-49-23-pm

More example on Big(O)
f(n) = 3n + 8 <= 4n for all n0 = 8 and c=4 O(n) f(n) = n2 + 1 <= 2n2 for all n0 = 1 and c=2 O(n2 )
f(n) = n4 + 100n2 + 50 <= 2n4 for all n0 = 11 and c=2 O(n4)
f(n) = 2n3+ 22 <= 2n3 for all n0 = 1 and c=2 O(n3 )
f(n) = n <= n2 for all n0 = 1 and c=1 O(n )
f(n) = 410 < = 410 for all n0 = 1 and c=1 O(1)

There are no unique set of values for n0 and c in proving the asymptotic bounds. Lets Consider, 100n + 5 = O(n)

Sol 1 : 100n + 5 <= 100n + n = 101n , for all n >= 5 and c =101
Sol 2 : 100n + 5 <= 100n + 5n = 105n , for all n >= 1 and c =105

References
Algorithm Design Manual – Steven S. Skiena
Design and Analysis of Algorithm – Anany Levitin
Beginning Algorithm – Simon Harris, James Ross
Data Structure And Algorithm with javaScript – Michael McMillan
Data Structures and Algorithms Made Easy – Narasimha Karumanchi

Understanding Angular JS Concepts

What is Angular JS?

The official AngularJS introduction describes AngularJS as a:

“client-side technology, written entirely in JavaScript. It works with the long-established technologies of the web (HTML, CSS, and JavaScript) to make the development of web apps easier and faster than ever before.”

In 2010, Miško Hevery was working at Google on a project called Feedback. Based on Google Web Toolkit (GWT), the Feedback project was reaching more than 17.000 lines of code and the team was not satisfied with their productivity. Because of that, Miško made a bet with his manager that he could rewrite the project in 2 weeks using his framework. After 3 weeks and only 1.500 lines of code, he delivered the project.
The name of the framework was given by Adam Abrons, and it was inspired by the angle brackets of the HTML elements.

Why use Angular JS?

The AngularJS team describes it as a “structural framework for dynamic web apps.” AngularJS makes it incredibly easy to build complex web applications. It is a framework that is primarily used to build single-page web applications.
A Single-page applications where an initial HTML document is sent to the browser, but user interactions lead to Ajax requests for small fragments of HTML or data inserted into the existing set of elements being displayed to the user. The initial HTML document is never reloaded or replaced, and the user can continue to interact with the existing HTML while the Ajax requests are being performed asynchronously, even if that just means seeing a “data loading” message.
AngularJS takes care of the concerns of the modern web applications, such as:
Separation of application logic, data models, controller and views (Model-View-Controller), Bi-directional Data Binding, Dependency injection, routing, Testing etc.

When Not to Use AngularJS?

AngularJS app is generally data-driven.It’s also a good choice if you are writing an application which interacts with lots of Rest web services.
If your application needs lot of DOM manipulations and data is not much important then a library like JQuery many be a perfect fit. AngularJS is also not a good choice for web application for game or where lot of graphics is involved.

Understand MVC in Angular Context

Server Side MVC
When you see MVC on server side, basically model represent a domain object, a controller represent a servlet or web service and view nothing but the presentation model which have data required to render on the UI which may be different from domain object.
Screen Shot 2015-12-26 at 4.18.08 pm
MVC in Angular
Here the MVC is on client side. In angular we have our view as html template where we have html component , view interact with controller, controller has all the ui business logic, it controls the data which is rendered on UI, the model is simple java script object which has bi-directional binding with ui component.
Screen Shot 2015-12-26 at 4.50.37 pm

Important component of an AngularJS app

  • Model:t is simple java script object and contains data which is shown to the user.
  • View: View is HTM template which is rendered on UI. It may contain angular directive, expressions. The view is compiled and linked with the angular controller scope.
  • Controller:The business logic that drives ur application.
  • Scope:A context and simple java script object which contain data and functions. The data model and functions is set to the scope by controller.Set up the initial state of the $scope object.
  • Directives:Something that we can add as HTML component. It extends HTML with custom elements and attributes.
  • Filters:Selects a subset of items from array and returns it as a new array
  • Resources: Used to communicate with server with http.
  • Expressions:Expressions are represented by {{}} in the html and is used to access scope model and functions

Angular App Life Cycle

Lets create a simple Angular app to trace the lifecycle of Angular App
Create a HTML file -helloWorld.html and put below content

<!DOCTYPE html>
<html ng-app="exampleApp">
<head>
    <title>Example</title>
    <script src="vendor/angular/angular.min.js"></script>
    <script src="app.js"></script>
</head>
<body ng-controller="helloWorldCtrl">
<div class="col-lg-4">
    <div class="panel-body">
        <input type="text" ng-model="name" placeholder="Your name">
        <hr/>
        <p>Welcome To Angular World:<strong> {{name}} </strong></p>
        <button ng-click="logMe()">Show Log</button>
    </div>
</div>
</body>
</html>

Create a file -app.js and put below content

angular.module("exampleApp", [])
    .controller("helloWorldCtrl", function($log, $scope) {

        $scope.name ='';
        $scope.logMe = function(){
          $log.log('Name Entered:: '+ $scope.name);
        };
    })
;

The above is simple Angular app with a module(exampleApp), a controller(helloWorldCtrl) and a simple view with some directives like ng-controller, ng-model etc.

Angular JS Life Cycle

How AngularJs Initializes the app (App bootstrapping)
<html ng-app=”exampleApp”> – The tag defines an ng-app directive attribute. Wherever Angular encounters this directive, it starts the initialization process. Since we have added ng-app to the tag, everything within the tag becomes part of our AngularJS app.
During this bootstrapping/initialization process Angular does the following:

  • It loads the module for the application. Modules are containers for various Angular artifacts. Modules are a way for AngularJS to organize and segregate code.
  • It sets up dependency injection (DI).
  • It creates a $rootScope object, which is a scope object available at the global level and not tied to any specific HTML fragment.
  • It compiles the DOM starting from where ng-app is declared. In this compilation process, the framework traverses the DOM, looks for all directives and interpolations {{}}, and sets up the binding between the view and model.
  • Post compilation, it links the view and scope to produce a live view where changes are synced across the model and viewed in real time as we interact with the app.

$rootScope and $scope are instances of the same class (a constructor function). The difference is just the context in which they are available. $rootScope is available throughout the HTML (within ng-app) whereas $scope is always scoped by a specific HTML element.
This compilation and linking process can also lead to the creation of new scopes, all of which depend on the directive that is being applied to the HTML node.
angular-life-cycle

What is $scope

  • Scopes are a core fundamental of any Angular app.
  • The $scope object is where we define the business functionality of the application, the methods in our controllers, and properties in the views.
  • This $scope object is a plain old JavaScript object. We can add and change properties on the $scope object.
  • All properties found on the $scope object are automatically accessible to the view.
  • Scope is the glue between Controller and View. Through $scope our Controller and View share data.

Every AngularJS application has at least one scope called $rootScope. This is created when we attach the ng-app directive to the HTML element. In other words you can say that during bootstrapping AngularJS create a $rootScope for your application.
When you attach ng-controller to any element of html, it creates a new child scope, which inherits from $rootScope. Child scope will have access to all the properties attached to parent scope.
Screen Shot 2015-12-27 at 4.27.04 pm

What Can $scope Do?

Scopes have the following basic functions:

  • They provide observers to watch for model changes.
  • They provide the ability to propagate model changes through the application.
  • They can be nested such that they can isolate functionality and model properties.
  • They provide an execution environment in which expressions are evaluated.
  • You can think of scopes as view models or presentation model.

What is Data Binding?

Data binding is the automatic synchronisation of data between View and the Model. When we say bi-directional binding, it mean that if something changes to model it will be reflect to View and if something changes to View it will be reflect to Model. As we have seen, we create model and set them on the $scope object. Then we tie out UI components with these model through expression {{}} or ng-model. This establishes a two-way binding between View component and model data.
Two_Way_Data_Binding

Watchers, $apply() and digest

When you write <input type=“text” ng-model=“name” /> the below steps happen :

  1. The directive ng-model registers a keydown listener with the input field. When the field text changes a keydown event is fired and the corresponding listener is called to handle it.
  2. Inside the keydown listener the directive assigns the new value of input field to the scope model specified in ng-model. In this case the name is updated with the new value. This code is wrapped inside$apply call.
  3. After $apply ends the digest cycle starts in which the watchers are called. If you have an expression {{name}} in the view it has already set up a watcher on scope model name. In the digest cycle the watchers gets called and the listener function executes with the newValue and oldValue as arguments. The job of this listener is to update the DOM with the newValue property using innerHTML.
  4. The result you see the {{name}} updated with whatever you type into the input field instantly.

Watcher Example – I: Lets put a simple watcher to the controller- Add below code to the ‘watcher.html’

<!DOCTYPE html>
<html ng-app="exampleApp">
<head>
    <title>Example</title>
    <script src="vendor/angular/angular.min.js"></script>
    <script src="app.js"></script>
</head>
<body ng-controller="helloWorldCtrl">
<div class="col-lg-4">
    <div class="panel-body">
        <input type="text" ng-model="name" placeholder="Your name">
        <hr/>
        <p>Welcome To Angular World:<strong> {{name}} </strong></p>
        <button ng-click="logMe()">Show Log</button>
    </div>
</div>
</body>
</html>

Create a file ‘app.js’ and put below code

angular.module("exampleApp", [])
    .controller("helloWorldCtrl", function($log, $scope) {

        $scope.logMe = function(){
          $log.log('Name Entered:: '+ $scope.name);
        };

        $scope.$watch(function(){
            $log.log('called in a digest cycle::: '+$scope.name);
            return;
        });
    })
;

Here we have watcher on scope, means it will be called when any scope model will be changed. Run the ‘watcher.html’ and enter some text to name field-
Screen Shot 2015-12-30 at 12.08.25 am
Here you can see – on the page load the digest cycle called 2 time, and on each character type it is called two times.
At the minimum the $digest() runs twice even if there are no model changes in the listener functions. The cycle runs once more to make sure the models are stable and no change has been made in the last loop, and this is called dirty checking.

Watcher Example – II: Add watcher to specific field- Add below code to the ‘watcher.html’

<!DOCTYPE html>
<html ng-app="exampleApp">
<head>
    <title>Example</title>
    <script src="vendor/angular/angular.min.js"></script>
    <script src="app.js"></script>
</head>
<body ng-controller="helloWorldCtrl">
<div class="col-lg-4">
    <div class="panel-body">
        <input type="text" ng-model="name" placeholder="Your name">
        <hr/>
        <p>Welcome To Angular World:<strong> {{name}} </strong></p>
        <button ng-click="logMe()">Show Log</button>
    </div>
</div>
</body>
</html>

Add below code to ‘app.js’ –

angular.module("exampleApp", [])
    .controller("helloWorldCtrl", function($log, $scope) {

        $scope.name='';


        $scope.logMe = function(){
          $log.log('Name Entered:: '+ $scope.name);
        };

        $scope.$watch('name', function(newValue , oldValue){
            $log.log('called in a digest cycle:::');
            $log.log('old value: '+oldValue +'  New Value: '+newValue);

            return;
        });
    })
;

Run the ‘watcher.html’ –
Screen Shot 2015-12-30 at 12.08.36 am
Here you can see – on the page load the digest cycle called and initially oldValue and newValue are blank.As soon as you type first character the newValue becomes ‘t’ and oldValue is still blank, when you type second character the oldValue becomes ‘t’ and newValue = ‘te’ and so on.

How does Angular know when a model changes and calls its corresponding watchers?

  • An Angular $scope has a function called $apply() which takes a function as an argument.
  • AngularJS says that it will know about model mutation only if that mutation is done inside $apply(). So you simply need to put the code that changes models inside a function and call $scope.apply(), passing that function as an argument.
  • After the $apply() function call ends, AngularJS knows that some model changes might have occurred. It then starts a digest cycle by calling another function —- $rootScope.$digest() — which propagates to all child scopes.
  • In the digest cycle watchers are called to check if the model value has changed. if a value has changed, the corresponding listener function then gets called. Now it’s up to the listener how it handles the model changes.
  • The watchers set up by an expression ({{}}) updates the DOM with the new value of the model.

What if the listener function of the watcher itself changes any model?

Let’s see what happen with the help of an example-
Watcher Example – III: Change model inside watcher- Add below code to the ‘watcher.html’

<!DOCTYPE html>
<html ng-app="exampleApp">
<head>
    <title>Example</title>
    <script src="vendor/angular/angular.min.js"></script>
    <script src="app.js"></script>
</head>
<body ng-controller="helloWorldCtrl">
<div class="col-lg-4">
    <div class="panel-body">
        <input type="text" ng-model="name" placeholder="Your name">
        <hr/>
        <p>Welcome To Angular World:<strong> {{name}} </strong></p>
        <button ng-click="logMe()">Show Log</button>
    </div>
</div>
</body>
</html>

Add below code to ‘app.js’ where we are changing the model inside watcher which will trigger watcher again and again–

//show digest limit
angular.module("exampleApp", [])
    .controller("helloWorldCtrl", function($log, $scope) {

        $scope.name='';


        $scope.logMe = function(){
          $log.log('Name Entered:: '+ $scope.name);
        };

        var count =0;
        $scope.$watch('name', function(newValue , oldValue){
            $log.log('called in a digest cycle:::');
            $log.log('Old Value: '+oldValue +'  New Value: '+newValue);
            $scope.name = 'clicked'+(count++);//changing model
            return;
        });
    })
;

Run the ‘watcher.html’
Screen Shot 2015-12-30 at 11.37.43 pm
You can see that watcher is called only 10 times and after that it throws some kind of error.

As I have written earlier, the digest cycle doesn’t run only once after $apply() call. After calling the listener functions, the digest cycle start all over again and fires each watcher to check if any of the models have been mutated the last loop. If any changes is found, the corresponding listener is called as usual and, if none of the models have changed, the digest cycle ends. Otherwise the digest cycle continues to loop until no model changes have been detected or it hits the maximum loop count 10(whichever comes first). The digest cycle will not run more than 10 times. It’s a bad idea to making model mutation inside listener functions.

Using $apply()

Use $apply() when you want to say – Angular that I am mutating some model, and now it’s your job is to fire the watchers!”. Angular does it implicitly if you are changing a model to Angular world, you are not suppose to wrap model change inside $apply().
But if you are mutating some model outside angular world then you will have to wrap the model changes inside $apply() call explicitly.
Consider Below example –
Example – Changing model outside Angular world:
Create a file ‘apply.html’ and put below code –

<!DOCTYPE html>
<html ng-app="exampleApp">
<head>
    <title>Example</title>
    <script src="vendor/angular/angular.min.js"></script>
    <script src="app.js"></script>
</head>
<body ng-controller="helloWorldCtrl">
<div class="col-lg-4">
    <div class="panel-body">
        <button ng-click="scheduleTask()">Get Message after 3 seconds</button>
        <br/>Message fetched: {{message}}
    </div>
</div>
</body>
</html>

Create a file ‘app.js’ and put below code –

angular.module("exampleApp", [])
    .controller("helloWorldCtrl", function($log, $scope) {

        $scope.logMe = function(){
          $log.log('Name Entered:: '+ $scope.name);
        };

        //ng-click trigger, watcher will not be called
        $scope.scheduleTask = function() {
            setTimeout(function() { //out side angular scope
                $scope.message = 'Fetched after 3 seconds'; // model mutation
                $log.log('message='+$scope.message); //log this to console
            }, 3000);
        };

        $scope.$watch('message', function(newValue , oldValue){
            $log.log('called in a digest cycle:::');
            $log.log('Old Value: '+oldValue +'  New Value: '+newValue);
            return;
        });
    })
;

Run the html –
Screen Shot 2015-12-31 at 12.19.27 am
You can see that the digest cycle only called on page load. When I click the button, the ‘scheduleTask()’ method called which mutate the model message, but the digest cycle doesn’t get called, because I am mutating that outside of Angular world inside timeout.

If you want to watcher to be called then put the model mutation code inside $apply() – Change your ‘app.js’ like below-

angular.module("exampleApp", [])
    .controller("helloWorldCtrl", function($log, $scope) {

        $scope.logMe = function(){
          $log.log('Name Entered:: '+ $scope.name);
        };

        //digest cycle will triggered
        $scope.scheduleTask = function() {

            setTimeout(function() {
                $scope.$apply(function() { // wrapped the code in $apply()
                    $scope.message = 'Fetched after 3 seconds';
                });
                $log.log('message='+$scope.message); //log this to console
            }, 3000);

        };


        $scope.$watch('message', function(newValue , oldValue){
            $log.log('called in a digest cycle:::');
            $log.log('Old Value: '+oldValue +'  New Value: '+newValue);
            return;
        });
    })
;

Run the html –
Screen Shot 2015-12-31 at 12.25.28 am
Now you can see, $digest cycle is called.

That is for now – In my next section I am going to write about $filter, custom directive, routing and resources for http request.

References
ANGULAR JS Novice to Ninja – Sandeep Panda
ng-book The Complete book on AngularJs – Ari Lerner
Pro Angular JS – Adam Freeman

CSS Box Model

CSS Box Model

All HTML elements can be considered as boxes. The position of each box is determined by the flow of the web page.
There are two main types of boxes:

  • block-level: A block-level box or element such as a <div>, heading, or paragraph — normally occupies all available horizontal space, beginning on a line of its own and pushing subsequent elements down onto a new line.
  • inline: an inline box or element—such as a <span>or image — sits alongside preceding and subsequent inline elements.

CSS allows you to change the way elements are displayed, so you can put block-level elements alongside one another or convert inline elements to act like block-level ones.The box model controls the width and height of elements, as well as the horizontal and vertical space around them. Understanding the box model is the key to successful page layout.

The CSS box model is essentially a box that wraps around HTML elements.The CSS box model consists of the following components:

css-box-model

Content This is the content of an HTML element, such as a paragraph, image, <div>, or <span>.
Padding Horizontal and vertical space surrounding the content.
Border A border drawn around the padding.
Margin Horizontal and vertical space outside the border.

If padding or borders are undeclared, they are either zero (if you are using a css reset) or the browser default value. Browsers apply default values to individual elements. For example, paragraphs have default top and bottom margins, but no padding or border, whereas <div> elements have no padding, border, or margins. You can use CSS to adjust the padding, border, and margins independently on each side of an element to control its look and layout.

Many people confuses the way in which width and height are calculated in modern browsers.
Let’s see it with an example:
Consider below style for div –

div {
    width: 100px;
    height: 50px;
    padding: 10px;
    border: 10px solid navy;
    margin: 5px;
}

Total box width = 100 + 20 + 20 + 10 = 150
And Height = 50 + 20 + 20 + 10 = 100

The total width of an element is calculated like this:

Total element width = width + left padding + right padding + left border + right border + left margin + right margin

The total height of an element is calculated like this:

Total element height = height + top padding + bottom padding + top border + bottom border + top margin + bottom margin

Please note that Internet Explorer 8 and earlier versions, include padding and border in the width property.
300px-W3C_and_Internet_Explorer_box_models_svg
Source :https://en.wikipedia.org/wiki/Internet_Explorer_box_model_bug

Doctype Modes

In the old days of the web, pages were typically written for Microsoft Internet Explorer. When the web standards were made at W3C, browsers start using them, as doing so would break most existing sites on the web. To solve the incompatibility issue Browsers introduced two modes- Standard Mode and Quirk Mode.To fix the box model problem, use Standard mode.

all browsers needed two modes: quirks mode for the old rules, strict mode for the standard/

For HTML documents, browsers use a DOCTYPE in the beginning of the document to decide whether to handle it in quirks mode or standards mode. Make sure you put the DOCTYPE right at the beginning of your HTML document. Anything before the DOCTYPE, like a comment or an XML declaration will trigger quirks mode in Internet Explorer 9 and older.
In html5 you will have to just write <!DOCTYPE html>

Go to the next page to understand Padding, Margins and box sizing to control these- Click on the below red circle with page number.

Paddings and Margins

Both paddings and margins add vertical and horizontal space around elements. To see the difference between margin and padding consider below html and its output.

<!DOCTYPE HTML>
<html>
<head>
<style type="text/css">
body{
 background:  #FFFFE0;
}
.not-padded{
  width: 200px;
  border: 1px solid green;
  margin: 10px;
  background:  #FFFFFF;
}
.padded{
  width: 200px;
  padding: 20px;
  border: 1px solid green;
  margin: 10px;
  background: #FFFFFF;
}
</style>
</head>
  <body>
    <div class='not-padded'>
      div1{
          width: 200px;
          margin: 10px;
          border: 1px solid green;
          color: red;
          background:  #FFFFFF;
          }
    </div>
    <div class='padded'> 
      div2{
          width: 200px;
          margin: 10px;
          border: 1px solid green;
          padding: 20px;
          background:  #FFFFFF;
          }
     </div>
  </body>
</html>

Save this page example.html and open in Chrome with developer console.
div without padding
without-padding

You can see that the content width is 200 which follow just inside border since padding is 0. Box width is 200 + 2(left+right border) + 20 (left and right margin) = 222

div with padding
padding

You can see that second div is 40 pixels greater than the first one because the left(20px) and right(20px) padding is added outside the content.
You can see that the content width is 200 and after that there is 20px padding then border comes. Box width is 200 + 40(left+right padding) + 2(left+right border) + 20 (left and right margin) = 262

Difference between padding and margin:

  • The content’s background (div yellow background) stretches to padding while in margin cantent’s parent background shows through margin – in this case yellow background of body.
  • padding – inside border, margin- outside border.
  • padding never collapse, adjacent vertical margin collapse When block-level elements follow one another.

As you can see that box model is confuses many developers while calculating width and height. People always used to calculate width and height from one side border to other side border.In fact IE interpret the box model like this only. In all the modern browsers if you want to calculate width or height then you will have to add padding and border.
i.e Actual width or height = width or height + 2*padding + 2*border.

CSS3 offers a way by which if you want then an element width and height will not be affected by border and padding. To get this behavior you will have to specify

box-sizing: border-box

There are other values which you can specify to the box-sizing:
border-box – Width and height include content, padding, and borders.
padding-box(only supported in Firefox at the moment.) – Width and height include both content and padding.
content-box – Width and height apply only to the content box. This is the default.

To see the effect of box-sizing, consider below html –

<!DOCTYPE HTML>
<html>
<head>
<style type="text/css">
body{
 background:  #FFFFE0;
}
.contentbox{
  width: 200px;
  padding: 20px;
  border: 1px solid green;
  margin: 10px;
  background: #FFFFFF;
  box-sizing: content-box;
}
.borderbox{
  width: 200px;
  padding: 20px;
  border: 1px solid green;
  margin: 10px;
  background: #FFFFFF;
  box-sizing: border-box;
}
</style>
</head>
<body>
<div class='contentbox'>
div1{
  width: 200px;
  padding: 20px;
  border: 1px solid green;
  margin: 10px;
  background: #FFFFFF;
  box-sizing: content-box;
}
</div>
<div class='borderbox'> 
div2{
  width: 200px;
  padding: 20px;
  border: 1px solid green;
  margin: 10px;
  background: #FFFFFF;
  box-sizing: border-box;
}
</div>

</body>
</html>

div with box-sizing: content-box;
Here you can see that the content width is 200 because the width is not calculated after adding padding and border.
content-box

div with box-sizing: border-box;
Here you can see that content width is 158 because we have given box-size as border-box — means width 200 includes padding and border.
200 – 40 (left and right border) – 2 (left and right border) = 158

border-box

The box-sizing property is not supported by IE 6 and IE 7.

The box-sizing property is not inherited, so you can apply it to individual elements.

Alternatively, you can apply it to all elements using the universal selector like this:

* {
-moz-box-sizing: border-box;
-webkit-box-sizing: border-box;
box-sizing: border-box;
}

References
Beginning CSS3 – David Powers
https://en.wikipedia.org/wiki/Internet_Explorer_box_model_bug
https://css-tricks.com/the-css-box-model/
https://css-tricks.com/box-sizing/

Binary Search Tree

Binary Search Tree

A Tree consists of nodes connected by edges. A binary tree is a tree in which no node can have more than two children. The two children of each node in a binary tree are called the left child and the right child. It is a finite set of nodes that can be either empty or consists of a root and two disjoint binary trees Tree Left and Tree Right called, respectively, the left and right sub-tree of the root. The left and right trees may themselves be empty; thus a node with one child could have either a left or right child.

Why to use binary tree?
As we know that searching is fast in an Ordered array and insertion and deletion is fast in linked list since we will have to change only links. Binary tree supports quick insertion and deletion as linked list and also quick searching as ordered array.

Going forward I will talk about most useful binary tree known as Binary search Tree.

What is Binary Search Tree?
A binary tree is a binary search tree if it satisfies following condition:

  • All children to the left of a node have smaller values than parent.
  • All children to the right of a node have larger values.

Binary-search-tree

For a balanced tree [-1<= (right sub-tree height – left sub-tree height) <=1] —as the one in above Figure—the height of the tree is O(log N). However, under certain circumstances, the height of the tree can degenerate, leading to a worst-case search time of O(N) for example in left Skewed tree or right skewed tree. The height of a balanced binary with n nodes is equal to ⌊log2n⌋.

It’s very easy to understand if you know the basics of Logarithms.

In above complete binary tree we have 15 nodes which we can write as 24-1.
2h+1-1 => 23+1-1 = 15 (approximately we raised 2 to the height of the tree to get number of nodes)
When you write log2n means that how many times you will raise 2 to get n. For ex. Log216 =4 => 24=16.

The properties of binary search tree allow very efficient operations like searching, finding Minimum, Maximum, Predecessor, Successor, insertion, and deletion. The average search time for a binary search tree is directly proportional to its height: O(h). Most of the operation average case time is O(Log2n).

I will divide the BST topic in following sections:

  1. Binary search tree implementation (Insert).
  2. General operations on BST – search, delete, minimum, maximum, predecessor and successor.
  3. BST traversal – In-Order, Pre-Order and Post-Order.
  4. Balancing BST.

Binary search tree implementation (Insert)

Let us insert into a BST the following values, in the order given: 6, 4, 5, 9, 2, 7. Since the tree is initially empty, the first value, 6, becomes the new tree’s root.
BT-1_
The next value, 4, is less than 6, and so the 4 becomes 6’s left child.
BT-2
The third value, 5, is less than 6, which means that the 5 must be placed somewhere in the root’s left subtree. Thus we move to 6’s left child is 4. Since 5 is greater than 4 and the node 4 has no right child, a new node containing 5 becomes 4’s right child.
BT-3
The next value is 9 which is greater than root value and so it will go to the right subtree. Since root node doesn’t have any right child we can directly add new node containing 9 to the right of root.
BT-4
The next value is 2 which is less than the root value 6 and so we will move to the left node, the left node value is 4 is greater than 2 so will move to the left of 4. Since there is no value to the left of 4, we can insert new node containing 2 to the left of 4.
BT-5
The next value is 7. Start from root – 7 is greater than the root value so we will move right – right node value id 9 which is greater than 7 so move left of 9. Since there is no node to the left of 9, we can insert new node containing 7 to the left of 9.
BT-6

Java implementation of Binary Search Tree

First create a node class.

public class Node {

    int value;
    Node left;
    Node right;
    Node parent;

    public Node(int value){
        this.value = value;
    }
}

Create Binary Search Tree Class and add some value to it

public class BinarySearchTree {

    Node root;

    public void add(Node node) {
        if (root == null) {
            root = node;
        } else {
            Node curr = root;
            Node parent = root;
            while (true) {
                parent = curr;
                if (node.value < curr.value) {
                    curr = curr.left;
                    if (curr == null) {
                        parent.left = node;
                        node.parent = parent;
                        return;
                    }

                } else if (node.value > curr.value) {
                    curr = curr.right;
                    if (curr == null) {
                        parent.right = node;
                        node.parent = parent;
                        return;
                    }
                }
            }
        }
    }
}

Inserting relatively random data usually enables the tree to maintain its O(log2N) height, but when you insert non-random data such as a ascending/descending natural numbers or word list from a dictionary the tree will degenerate into a linked list and the height of the tree—and with it the average search time—becomes O(N). It will be either left skewed tree or right skewed tree which is not a balanced tree. There are many variations on BST which is used to balance the unbalanced tree like Red-Black Tree, AVL tree etc. (I will talk later)

Search in a Binary Search Tree

  1. Start at root.
  2. if root is null, the search value was not found, end the search.
  3. if search-> value = root -> value then you found the value.
  4. if search-> value < root -> value then follow the left subtree and go to step 2
  5. if search-> value > root -> value then follow the right subtree and go to step 2
 public Node findNode(int key) {
        Node currentNode = root;
        while (currentNode.value != key) {
            if (key < currentNode.value) {
                currentNode = currentNode.left;
            } else {
                currentNode = currentNode.right;
            }

            if (currentNode == null) {
                return null;
            }
        }

        return currentNode;
    }

Minimum
The minimum of a binary search tree is the node with the smallest value. You just follow the left links to get the minimum. The minimum is the left most node in the tree.

public int findMinimum() {
        Node currentNode = root;
        while (currentNode.left != null) {
            currentNode = currentNode.left;
        }
        return currentNode.value;
    }

Maximum
The maximum is the node with the largest value. Finding the maximum is very similar to finding the minimum except that you follow the right links instead of the left. In other words, the maximum is the rightmost node in the tree.

public int findMaximum() {
        Node currentNode = root;
        while (currentNode.right != null) {
            currentNode = currentNode.right;
        }
        return currentNode.value;
    }

Go to the next page – Click on the below red circle with page number.

Dynamic Programming

What is Dynamic programming?

  • Dynamic programming was invented by a prominent U.S. mathematician, Richard Bellman, in the 1950s.
  • Dynamic Programming is nothing to do with computer programming. Here programming means planning.
  • It is a method for optimizing multistage decision making process.
  • It is an algorithm design technique always considered to solve optimization problem.
  • More efficient than “brute-force methods”, which solve the same subproblems over and over again.

When to use?

  • Dynamic programming is used to solve problems which have overlapping sub-problems.
  • When problem breaks down into recurring small dependent sub-problems.
  • When the solution can be recursively described in terms of solutions to sub-problems.

How it works?
Dynamic programming algorithm finds solutions to sub-problems and stores them in memory for later use. It is sometimes considered the opposite of recursion. Where a recursive solution starts at the top and breaks the problem down, solving all small problems until the complete problem is solved, a dynamic programming solution starts at the bottom, solving small problems and combining them to form an overall solution to the big problem. It is used to convert algorithm of complexity 2n to O(n3) or O(n2).

It’s always better if you understand the Dynamic programming with the help of problems.
We will solve following problems with the help of Dynamic programming

  1. Fibonacci Series
  2. Coin Row Problem
  3. Change Making Problem
  4. Minimum Coin Change
  5. Robot Coin Collection
  6. Levenshtein distance

Let’s start with the easiest one Fibonacci series.
Fibonacci Series : As we know that Fibonacci series is the element of sequence

0,1,1,2,3,5,8,13,21,34,55. . . .

And nth Fibonacci number is defined by the recurrence relation
If n=0 then f(0) = 0
If n=1 then f(1) = 1
Otherwise f(n) = f(n-2)+f(n-1)

We can define a recursive method using this recurrence relation.

    public int fibonacci_rec(int n) {
        if (n <= 0) {
            return 0;
        }
        if (n == 1) {
            return 1;
        }
        return fibonacci_rec(n - 1) + fibonacci_rec(n - 2);
    }

For example: suppose that we want to calculate 6th Fibonacci number using above method.
Recursion tree for 6th Fibonacci number
Dynamic-Programming

To compute F(6), there is one call to F(5) and F(4). However, since
F(5) recursively makes a call to F(4) and F(3), there are actually two separate calls
to compute F(4). If you will trace out the entire algorithm, you will observe that F(4) is computed two times, F(3) is computed three times, f(2) is computed five times, F(1) is computed eight times, and so on. We are re-computing the same values many times. The growth of redundant calculation is exponential.

We can improve it using Dynamic programming. We can use a single dimensional array as a cache to store the result of each computed Fibonacci number and before computing we will check in this array that if the value already exist. If exist then no need to recomputed.

public class FibonacciNumber {

    private static final int MAXN = 45;
    private Integer[] f = new Integer[MAXN];

    public int fibonacci(int n) {
        f[0] = 0;
        f[1] = 1;
        for (int i = 2; i <= n; i++) {             f[i] = f[i - 1] + f[i - 2];
        }
        return f[n];
    }
}

Actually to calculate Nth Fibonacci we don’t need all the Fibonacci number from 1 to n-1, we just need previous two numbers ie (n-2) and (n-1).

 public int fibonacci(int n) {
        if(n==1){
            return 0;
        }
        int back2 = 0;
        int back1 = 1;
        int next;
        for (int i = 2; i < n; i++) {
            next = back2 + back1;
            back2 = back1;
            back1 = next;

        }
        return back2 + back1;
    }

Coin Row Problem : Coin-rowproblem There is a row of n coins whose values are some positive integers c1, c2, . . . , cn, not necessarily distinct. The goal is to pick up the maximum amount of money subject to the constraint that no two coins adjacent in the initial row can be picked up.

Or in other words

There is an integer array consisting positive numbers only. Find maximum possible sum of elements such that there are no 2 consecutive elements present in the sum.

For ex: Coins[] = {5, 22, 26, 15, 4, 3,11}
Max Sum = 22 + 15 + 11 = 48

To solve this problem using Dynamic Programming first we will have to define recurrence relation.
Let F[n] is the array which will contain the maximum sum at n for any given n. The recurrence relation will be.

F(n) = max{Coins[n] + F[n − 2], F[n − 1]} for n > 1,
F(0) = 0, F(1) = Coins[1].

This is very easy to understand. While calculating F[n] we are taking maximum of coins[n]+the previous of preceding element and the previous element.
For example F[2] = max{coins[0]+ F[2-2], F[2-1]} // No consecutive

The algorithm:

public class CoinRow {

    public static int getMaximumAmount(int[] coins) {
        assert coins.length > 0 : "no coins to select";

        int[] C = new int[coins.length + 1];
        for (int i = 0; i < coins.length; i++) {
            C[i + 1] = coins[i];// make room at first place
        }

        int[] F = new int[coins.length + 1];
        F[0] = 0;
        F[1] = C[1];

        for (int i = 2; i <= coins.length; i++) {
            F[i] = max(C[i] + F[i - 2], F[i - 1]);
        }
        return F[coins.length];
    }

    private static Integer max(int i, int j) {
        return i > j ? i : j;
    }

    public static void main(String[] args) {
        int[] coins = { 5, 22, 26, 10, 4, 8};
        System.out.println(getMaximumAmount(coins));
    }
}
Output
-------
40

Lets trace the algorithm.
Coin-Row-1

Coin-Row-2

F[6] will have the final value.

Go to the next page – Click on the below red circle with page number.

Extract text from a webpage

Extract main textual content from a webpage.

Today I am going to discuss some of the libraries which can be used to extract main textual content and remove boilerplate or clutter content from a webpage.
We see tons of pages every day with full of advertisement, copyright statements, links, images etc. These are not the actual relevance content of webpage but the boilerplate contents.
There are many Java supported libraries which we can use to extract textual content from Wikipedia, news article, blog content etc.
Before exploring library it is important to know that –

  • Each page has different structure (in terms of tags).
  • Actual data are segregated by different paragraph, heading, div with content class etc.
  • For example when you search “Obama” and see the source of first two links i.e. http://en.wikipedia.org/wiki/Barack_Obama and http://www.barackobama.com/.
    Both the page has different structure.

No parser has any Artificial intelligence; it is just the heuristic algorithm with well-defined rule which works behind the scene. They work on DOM (document object model). Most of the parser or HTML page stripper require user to supply tag name to get data of individual tag or it return the whole page text.
These libraries don’t work on all the pages due to vary nature of page content in terms of tags.

We will see example of following libraries:

Boilerpipe: Boilerpipe is a Java library written by Christian Kohlschütter. It is based on Boilerplate Detection using Shallow Text Features. You can read here more about shallow text feature .
There is also a test page deployed on Google app engine where you can enter a link and it will give you page text.
URL:- http://boilerpipe-web.appspot.com/
Boilerpipe is very easy to use. Add following dependency to POM

<repository>
    <id>boilerpipe-m2-repo</id>
    <url>http://boilerpipe.googlecode.com/svn/repo/</url>
</repository>
<dependency>
   <groupId>de.l3s.boilerpipe</groupId>
   <artifactId>boilerpipe</artifactId>
   <version>1.2.0</version>
</dependency>

There are five types of extractor –
ARTICLE_EXTRACTOR: Works very well for most types of Article-like HTML.
CANOLA_EXTRACTOR: Trained on krdwrd Canola (different definition of “boilerplate”). You may give it a try.
DEFAULT_EXTRACTOR: Usually worse than ArticleExtractor, but simpler/no heuristics.
KEEP_EVERYTHING_EXTRACTOR: Dummy Extractor; should return the input text. Use this to double-check that your problem is within a particular BoilerpipeExtractor, or somewhere else.
LARGEST_CONTENT_EXTRACTOR: Like DefaultExtractor, but keeps the largest text block only.

Java Example

package com.test;

import java.net.URL;

import de.l3s.boilerpipe.document.TextDocument;
import de.l3s.boilerpipe.extractors.CommonExtractors;
import de.l3s.boilerpipe.sax.BoilerpipeSAXInput;
import de.l3s.boilerpipe.sax.HTMLDocument;
import de.l3s.boilerpipe.sax.HTMLFetcher;

public class BoilerpipeTextExtraction {
	public static void main(String[] args) throws Exception {
		final HTMLDocument htmlDoc = HTMLFetcher.fetch(new URL("http://www.basicsbehind.com/stack-data-structure/"));
		final TextDocument doc = new BoilerpipeSAXInput(htmlDoc.toInputSource()).getTextDocument();
		String content = CommonExtractors.ARTICLE_EXTRACTOR.getText(doc);
		System.out.println(content);
	}
}

JSoup: As per Jsoup official page – jsoup is a Java library for working with real-world HTML. It provides a very convenient API for extracting and manipulating data, using the best of DOM, CSS, and jquery-like methods.
JSoup implements the WHATWG HTML5 specification, and parses HTML to the same DOM as modern browsers do.
Test page for JSoup: http://try.jsoup.org/

How to use JSoup:

You can use JQuery like selector to get the content of a tag.

Enter following entry to POM-

<dependency>
   <groupId>org.jsoup</groupId>
   <artifactId>jsoup</artifactId>
   <version>1.7.3</version>
</dependency>

Java Code

package com.test;

import org.jsoup.Jsoup;
import org.jsoup.nodes.Document;

public class JSoupExtractor {
	public static void main(String[] args) throws Exception {

		Document doc = Jsoup.connect("http://www.basicsbehind.com/stack-data-structure/").get();
		// select title of the page
		System.out.println(doc.title());
		// select text of whole page
		System.out.println(doc.text());
		// select text of body
		System.out.println(doc.getElementsByTag("body").text());
		// select text of paragraph
		System.out.println(doc.getElementsByTag("p").text());
	}

}

Apache Tika: Apache Tika is a content analysis tool which can be used to extracts metadata and text content from various documents.

Enter following dependency to POM-

<dependency>
    <groupId>org.apache.tika</groupId>
    <artifactId>tika-core</artifactId>
    <version>1.5</version>
</dependency>

Java Code

package com.test;

import java.io.InputStream;
import java.net.URL;
import org.apache.tika.metadata.Metadata;
import org.apache.tika.parser.ParseContext;
import org.apache.tika.parser.html.HtmlParser;
import org.apache.tika.sax.BodyContentHandler;
import org.apache.tika.sax.LinkContentHandler;
import org.apache.tika.sax.TeeContentHandler;
import org.apache.tika.sax.ToHTMLContentHandler;
import org.xml.sax.ContentHandler;
public class ApacheTikaExtractor {
	public static void main(String[] args) throws Exception{
		URL url = new URL("http://www.basicsbehind.com/stack-data-structure/");
	    InputStream input = url.openStream();
	    LinkContentHandler linkHandler = new LinkContentHandler();
	    ContentHandler textHandler = new BodyContentHandler();
	    ToHTMLContentHandler toHTMLHandler = new ToHTMLContentHandler();
	    TeeContentHandler teeHandler = new TeeContentHandler(linkHandler, textHandler, toHTMLHandler);
	    Metadata metadata = new Metadata();
	    ParseContext parseContext = new ParseContext();
	    HtmlParser parser = new HtmlParser();
	    parser.parse(input, teeHandler, metadata, parseContext);
	    System.out.println("title:\n" + metadata.get("title"));
	    System.out.println("links:\n" + linkHandler.getLinks());
	    System.out.println("text:\n" + textHandler.toString());
	    System.out.println("html:\n" + toHTMLHandler.toString());
	}
	

}

Linked List

Linked List

As we know that Array is very useful data structure but it has certain limitations:

  1. changing the size of the array requires creating a new array and then copying all data from the array with the old size to the array with the new size and
  2. the data in the array are next to each other sequentially in memory, which means that inserting or deleting an item inside the array requires shifting some other data in this array.

This limitation can be overcome by using linked structures. Linked lists is a simple data structure which contains individual elements(say nodes) with links between them and the nodes are arranged in a linear order. Each node in a linked list contains a reference (or link) to the next node. As compared to Array, Linked List has some advantage- Linked list is unbounded, deletion of an element is faster because only you have to change some links, there is no shifting of elements. You can use a linked list in many cases in which you use an array, unless you need frequent random access to individual items using an index.

Types of Linked List

    • Singly Linked List: If a node has a link only to its successor in a Linked List, then the list is called a singly linked list. A node includes two data fields: info and next. The info field is used to store information, and this field is important to the application. The next field is used to link together nodes to form a linked list. Last node point to null.
      Singly Linked List
Java implementation of Singly Linked List

Create a Node class first which will keep info and link to the next element.

public class Node {

	int info;
	Node next;

	public Node(int info) {
		this.info = info;
	}

	public void displayNode() {
		System.out.print("[" + info + "]->;");
	}
}

Create LinkList class which will hold nodes.

public class LinkList {

	private Node first;
	
	public LinkList() {
		first = null;
	}
        public Boolean isEmpty(){
                return first == null;
        }
	public void insertFirst(int info) {
		Node node = new Node(info);
		node.next = first;
		first = node;
	}

	public void insertLast(int info) {
		Node node = new Node(info);
		if (first == null) {
			first = node;
		} else {
			Node current = first;
			while (current.next != null) {
				current = current.next;
			}
			current.next = node;
		}
	}

	public boolean delete(int info) {
		assert isEmpty(): "Empty list";
		// if it is the first element then move first one element further
		if (first.info == info) {
			first = first.next;
			return true;
		} else {
			Node current = first;
			Node previous = first;
			while (current != null && current.info != info) {
				previous = current;
				current = current.next;
			}
			if (current != null) {
				previous.next = current.next;
				return true;
			} else {
				System.err.println("No match found in the list for value:"+ info);
				return false;
			}
		}
	}

	public Node find(int info) {
		assert isEmpty(): "Empty list";
		Node current = first;
		while (current != null && current.info != info) {
			current = current.next;
		}
		if (current != null) {
			return current;
		} else {
			System.err.println("No match found in the list for value:" + info);
			return null;
		}
	}

	public void displayList() {
		Node current = first;
		while (current != null) {
			current.displayNode();
			current = current.next;
		}
		System.out.println();
	}

	public static void main(String[] args) {
		LinkList linkedList1 = new LinkList();
		linkedList1.insertFirst(5);
		linkedList1.insertFirst(10);
		linkedList1.insertFirst(15);
		linkedList1.insertFirst(20);
		System.out.println("First List-");
		linkedList1.displayList();
		linkedList1.delete(15);
		System.out.println("After deleting 15-");
		linkedList1.displayList();

		LinkList linkedList2 = new LinkList();
		linkedList2.insertLast(5);
		linkedList2.insertLast(10);
		linkedList2.insertLast(15);
		linkedList2.insertLast(20);
		System.out.println("Second List-");
		linkedList2.displayList();
		linkedList2.delete(5);
		System.out.println("After deleting first element 5-");
		linkedList2.displayList();

	}
}
Output
-------
First List-
[20]->[15]->[10]->[5]->
After deleting 15-
[20]->[10]->[5]->
Second List-
[5]->[10]->[15]->[20]->
After deleting first element 5-
[10]->[15]->[20]->

Let’s understand each methods in detail.
insertFirst(): This method insert a new node at the beginning of the list. This is very simple – create a new Node to insert and points its next to the old first, now you have new Node at the start so make it first. Using insert first you can create a Stack. It take O(1) time.
Singly Linked List-insert
insertLast(): This method insert a new node at the end of the list. You traverse the whole list to reach at the last position. Point the next pointer of last to the new Node. It takes O(n) time where n is the current size of the list.
Singly Linked List-insertlast
delete(): Delete the Node of given value. If the first Node contain the value then just move first to the next element of first else traverse the list to find the Node, maintain current and previous pointer where previous will point to the previous Node of current. After finding node just point previous->next to current->next. In worst case it will take O(n) time where the element is at the last position or there is no such element in list.
Singly Linked List-delete
find(): This method traverse the list and match each Node value to the given value, if match is found it return the Node. In worst case it will take O(n) time where the element is at the last position or there is no such element in list.

Go to the next page – Click on the below red circle with page number.

Google Search Programmatically

Google Custom Search Programmatically

Using JSON/Atom Custom Search API, you can use RESTful requests to get either web search or image search results in JSON or Atom format.

Pricing options for Google Custom Search
JSON/Atom Custom Search API pricing and quotas depend on the engine’s edition:

  1. Custom Search Engine (free): For CSE users, the API provides 100 search queries per day for free. If you need more, you may sign up for billing in the Cloud Console. Additional requests cost $5 per 1000 queries, up to 10k queries per day.
  2. Google Site Search (paid): For detailed information on GSS usage limits and quotas, please check GSS pricing options.

Prerequisites for Google Custom Search
For performing google search through a program, you will need a developer api key and a custom search engine id.

How to get Google Developers API key?
Step 1: Log in to Google Developers Console with your google id (gmail).
Step 2: Create a project. Click on create project.
google search programatically
Step 3: Enter Project Name. Check the agreement check box and click on create.
google search programatically-1
Step 4: Now you can see the Project dashboard of newly created project. Now click on APIs & auth ->auth. Switch on the Custom Search API, by default it is off.
google search programatically-2
Step 5: Click on Credentials -> Create New Key (under Public api access)
google search programatically-3
Step 6: Click on Server key.
google search programatically-4
Step 7: Save your API key in notepad.
google search programatically-5
How to create Google Custom Search Engine?
Google Custom Search by Google allows web developers to include google search box in their web pages. The search box can be configured to search their own website or any other website they are configured to search.
Step 1: Log in to Google Custom Search
Step 2: Select New Search Engine
Step 3: Now you can enter the websites to be searched using google custom search. You can also include entire domains instead of specific websites as shown below.
google search programatically-6
Step 4: Click on create. It will show you below Screen.
google search programatically-7
Step 5: Click on get Code, note down the code (cx=xxxxx). If you want Google search box in you blog or website, you can copy paste the below script directly to your website.
google search programatically-8
Step 6: Your URL will look like below with search string “BasicsBehind”
google custom search

Google Search Programmatically using JAVA

import java.io.BufferedReader;
import java.io.InputStreamReader;
import java.net.HttpURLConnection;
import java.net.URL;

public class CustomGoogleSearch {
	final static String apiKey = "AIzaSyAFmFdHiFK783aSsdbq3lWQDL7uOSbnD-QnCnGbY";
	final static String customSearchEngineKey = "00070362344324199532843:wkrTYvnft8ma";
	final static String searchURL = "https://www.googleapis.com/customsearch/v1?";

	public static String search(String pUrl) {
		try {
			URL url = new URL(pUrl);
			HttpURLConnection connection = (HttpURLConnection) url.openConnection();
			BufferedReader br = new BufferedReader(new InputStreamReader(connection.getInputStream()));

			String line;
			StringBuffer buffer = new StringBuffer();
			while ((line = br.readLine()) != null) {
				buffer.append(line);
			}
			return buffer.toString();
		} catch (Exception e) {
			e.printStackTrace();
		}
		return null;
	}
	private static String buildSearchString(String searchString, int start, int numOfResults) {
		String toSearch = searchURL + "key=" + apiKey + "&cx=" + customSearchEngineKey + "&q=";

		// replace spaces in the search query with +
		String newSearchString = searchString.replace(" ", "%20");

		toSearch += newSearchString;

		// specify response format as json
		toSearch += "&alt=json";

		// specify starting result number
		toSearch += "&start=" + start;

		// specify the number of results you need from the starting position
		toSearch += "&num=" + numOfResults;

		System.out.println("Seacrh URL: " + toSearch);
		return toSearch;
	}


	public static void main(String[] args) throws Exception {

		String url = buildSearchString("BasicsBehind", 1, 10);
		String result = search(url);
		System.out.println(result);

	}
}

You can add other parameters to Google search with ‘&’ operator, for example lr=lang_en restricts the search to documents written in a English language.
You can find complete list of parameters here:-
Parameters to pass with the search query to filter the results:
https://developers.google.com/custom-search/json-api/v1/reference/cse/list#response
Language and country codes to pass with query:
https://developers.google.com/custom-search/docs/xml_results#countryCodes

Questions On Stack and Queue

I would highly recommend to read below posts before getting into questions on stack and queue-

Questions On Stack and Queue


Problem-1: Show how to implement a queue using two stacks.

The difference between stack and queue is the order, stack uses last in first out(LIFO) and queue uses first in first out(FIFO). Our goal here is to convert LIFO to FIFO. To achieve FIFO using Stack somehow we will have to reverse the order of Stack. We can use our second Stack to reverse the order of the elements by popping from Stack-1 and pushing the elements on to Stack-2.
Questions On Stack and Queue
Stack-1 will thus be ordered with the newest elements on the top, while Stack-2 will have the oldest elements on the top. We push the new elements onto Stack-1, and peek and pop from Stack-2. When Stack-2 is empty, we’ll transfer all the elements from Stack-1 onto Stack-2, in reverse order.

public class QueueWithTwoStacks {
	Stack  oldStack;
	Stack  newStack;

	public QueueWithTwoStacks() {
		oldStack = new Stack();
		newStack = new Stack();
	}

	public int size() {
		return oldStack.size() + newStack.size();
	}

	public void enqueue(int value) {
		newStack.push(value);
	}

	public int dequeue() {
		shiftStack();
		return oldStack.pop();
	}

	private void shiftStack() {
		//shift only if old stack is empty
		if (oldStack.size() == 0) {
			while (newStack.size() > 0) {
				oldStack.push(newStack.pop());
			}
		}
	}
	
	public static void main(String[] args) {
		QueueWithTwoStacks queue = new QueueWithTwoStacks();
		queue.enqueue(10);
		queue.enqueue(18);
		queue.enqueue(5);
		queue.enqueue(29);
		queue.enqueue(27);
		queue.enqueue(6);
		
		System.out.println(queue.dequeue());
		System.out.println(queue.dequeue());
	}
}
Output
--------
10
18


Problem-2: Show how to implement a Stack using two Queues.

This is just opposite of above question. Here we have to convert FIFO to LIFO and using two Queues. The solution is very simple.

When Push() is called, enqueue() into Q1.

question on stack and queue-2

When Pop() is called, move up to Q1.size-1 elements from Q1 to Q2. Now Q1 has the last element, dequeue() this last element and move elements back from Q2 to Q1.

question on stack and queue-3

public class StackWithTwoQueues {

	Queue oldQueue;
	Queue newQueue;
	
	public StackWithTwoQueues(){
		oldQueue = new Queue();
		newQueue = new Queue();
	}
	
	public void push(int item){
		oldQueue.enqueue(item);
	}
	public Integer pop(){
		copy(oldQueue,newQueue,1);//leave last element in old queue
		int value =oldQueue.dequeue();//remove last element
		copy(newQueue,oldQueue,0);//copy back all the elements
		return value;
	}
	private void copy(Queue src,Queue target, int upto){
		if(target.size()==0){ 
			while(src.size()>upto){
				target.enqueue(src.dequeue());
			}
		}
	}
	
	public static void main(String[] args) {
		StackWithTwoQueues stack = new StackWithTwoQueues();
		stack.push(50);
		stack.push(10);
		stack.push(4);
		stack.push(34);
		stack.push(3);
		stack.push(12);
		stack.push(60);
		
		System.out.println(stack.pop());
		System.out.println(stack.pop());
		System.out.println(stack.pop());
		
		
		stack.push(55);
		stack.push(33);
		
		System.out.println(stack.pop());
		System.out.println(stack.pop());
		System.out.println(stack.pop());
	}
	
}

Output
---------
60
12
3
33
55
34


Problem-3: Design a stack which, in addition to push() and pop(), also has functions min() which returns minimum element and max() which return maximum element. All operations should operate in O(1) time.

Here we will decorate the original Stack by extending from it. The MinMaxStack will have two Stacks to maintain minimum and maximum values.

public class MinMaxStack extends Stack{

	private Stack minStack;
	private Stack maxStack;
	
	public MinMaxStack(){
		minStack = new Stack();
		maxStack = new Stack();
	}
	
	public void push(int value){
		if(min() ==-1 || value < min()){
			minStack.push(value);
		}
		if(max() ==-1 || value > max()){
			maxStack.push(value);
		}
		super.push(value);
	}
	
	public int pop(){
		int value = super.pop();
		if(value == min()){
			minStack.pop();
		}
		if (value == max()) {
			maxStack.pop();
		}
		return value;
	}

	public int min() {
		if(minStack.size()>0){
			return minStack.peek();
		}
		return -1;
	}
	
	public int max() {
		if (maxStack.size() > 0) {
			return maxStack.peek();
		}
		return -1;
	}
	public static void main(String[] args) {
		MinMaxStack stack = new MinMaxStack();
		stack.push(50);
		stack.push(10);
		stack.push(4);
		stack.push(34);
		stack.push(3);
		stack.push(12);
		stack.push(1);
		System.out.println("MIN: "+stack.min());
		System.out.println("MAX: "+stack.max());
	}

}
Output
--------
MIN: 1
MAX: 50


Problem-4: Write a program to sort a stack in ascending order(with biggest item on top). You may use at most one additional stack to hold items, but you may not copy the elements into any other data structure.

We have two stacks. Suppose that S2 is sorted and S1 is not sorted.
question on stack and queue-4
When we pop 7 from S1, it should be placed at the right position in S2 ie just above 6. We already have two elements 8 and 12 above 6. We can place 7 at right position in S2 by popping 7 from S1 and keeping it in a temporary variable. Then moving all the items from S2 to S1 which is greater than 7 and then push 7 to S2. Repeat the process for all the items in S1.
question on stack and queue-5

public class SortedStack {

	public static Stack sortStack(Stack src){
		Stack r = new Stack();
		while(!src.isEmpty()){
			int temp = src.pop();
			while(!r.isEmpty() && r.peek() > temp){
				src.push(r.pop());
			}
			r.push(temp);
		}
		return r;
	}
	
	public static void main(String[] args) {
		Stack s = new Stack();
		s.push(10);
		s.push(12);
		s.push(8);
		s.push(7);
		s.push(11);
		s.push(5);
		Stack r =SortedStack.sortStack(s);
		for(int i=0;i<6;i++){
			System.out.print(r.pop()+" ");
		}
	}
}
Output
----------
12 11 10 8 7 5 

References:

  • Cracking The Coding Interview- Gayle Laakmann McDowell
  • Programming Interviews Exposed- John Mongan, Eric Giguère, Noah Kindler.
  • Coding Interviews- Harry He